

I was asked recently to help out someone with a few features on their Garmin training watch and it made me realise that a lot of the features that I regularly use on my watch aren’t that obvious meaning that people often don’t get the most of a very capable device. Here are a few things that your watch is really good at.
Workouts
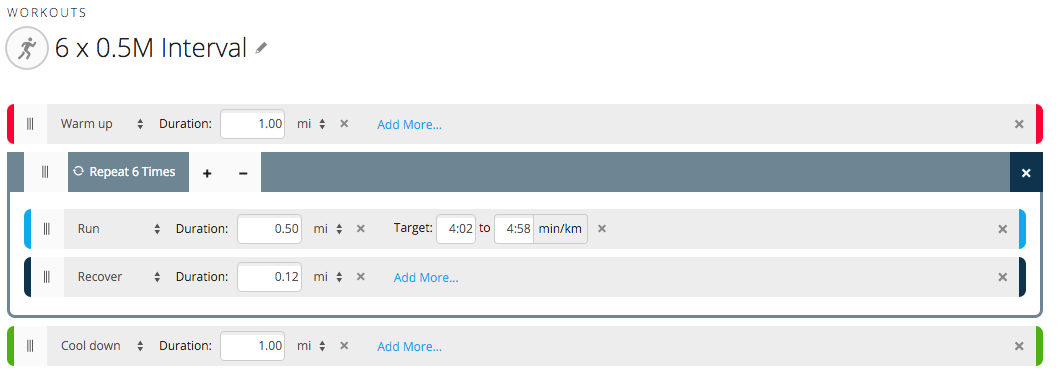
Workouts allow your watch to direct you such that you are achieving your goals during a training session. By goals we mean things such a speed, pace or heart rate over a time or distance. For example you can have your watch warn you if you are not staying within a pace goal of 7:00 – 8:00 min/mile over a distance of 800 metres, warning you if you are going too fast or too slow, similarly you can set goals for your heart rate to be within a range of 70% to 80% for 10 minutes. Workouts can be structured meaning that they are a series of goals that you follow one after the other, a classic example is an interval session with a warm-up and cool down:
Tips
- When you complete a workout the watch plays a little tune and then stops the activity. That’s fine if you are on a treadmill but chances are you’ve still got a way to go before you are really done. It’s possible to continue the workout but you will lose a few seconds; instead add an extra “no target” step to the end of every workout and just stop the watch normally when you have reached the end.
- The watch can get pretty annoying with pace alerts if you’ve set a fairly narrow desired range, especially if GPS accuracy isn’t great. It’s therefore better to have a wider range and treat it is a “always go faster than” (have a really fast upper bound) or “always go slower than” (have a really slow lower bound)
Training plans
A training plan is a calendar where you define particular workouts that you should complete on a given date. This is a great benefit when you head out first thing in the morning and can just fire up your watch and say “do today’s run”. The watch will then tell you when to speed up, slow down, work harder, ease off, etc.
It’s quite a lot of effort to set all this up in Garmin Connect but once it’s done it can be a great motivator – you just do what the watch is telling you with no deciding what you feel like at the crack of dawn!
Navigation
The easy way
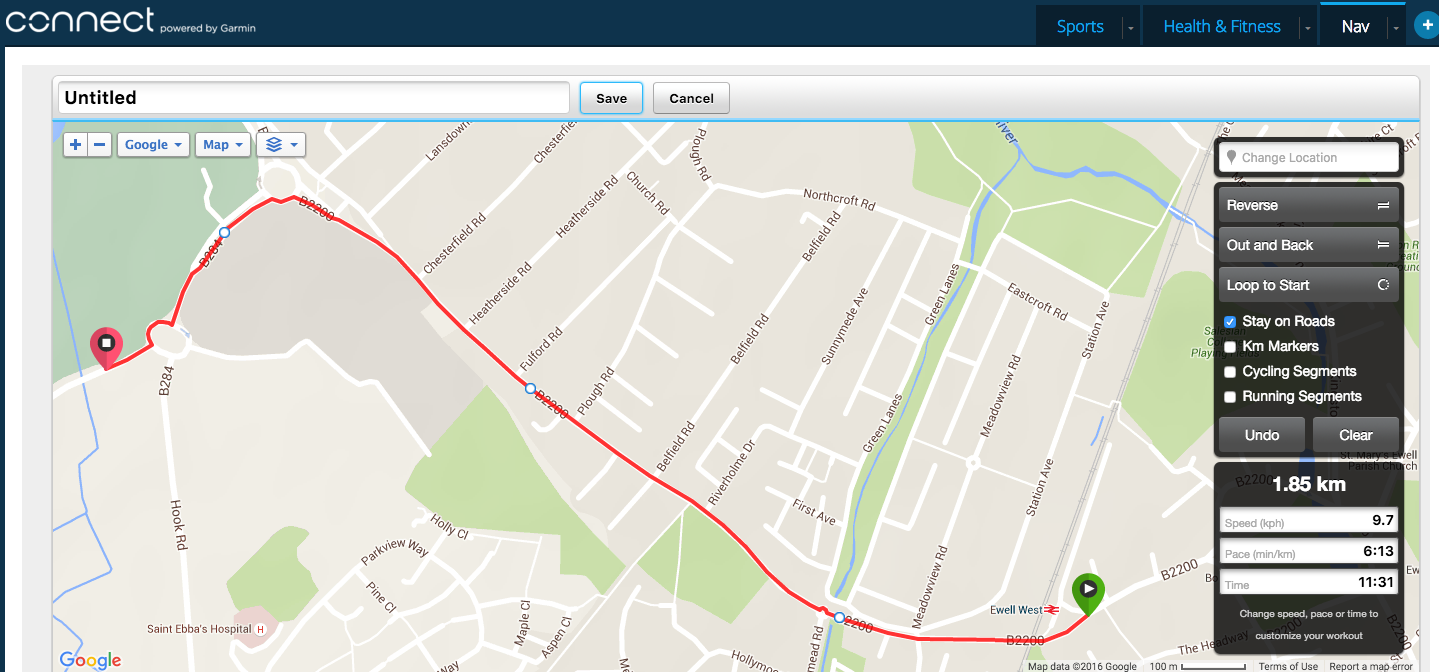
Plot a route on Garmin Connect, clicking your way round the map.
In Garmin Connect go to Courses and click the plus button to create a new course. Next:
- Type in a place name close to the start to centre the map on that and zoom in until you find the right spot
- Click once on the start point and this will drop a green marker
- For a road route leave the “stay on roads” option checked as this will allow you to click infrequently with Connect figuring out the route between two points; for trail you are better off switching this off and clicking points more frequently (Connect will just draw a straight line between each point)
- Type in a speed or pace on the right hand side – this govern the speed of a “virtual partner” you can compare yourself when following the course.
- Give the course and name and hit Save.
- Click “send to device” and connect your watch
- On the watch go to Navigation | Courses and find the newly uploaded course and hit Start and Do Course.
- Select the type of workout (run, bike, etc), wait for a GPS lock and then his start
- You’ll now have a map screen as one of the screens you can scroll to where you can see the path ahead and a track of where you’ve been. the watch will give you alerts if you deviate from the course and again when you rejoin it.
 A better way
Garmin Connect’s interface is quite limiting and there are better alternatives for creating routes (RideWithGps, Mapometer, Ordnance Survey, etc). Connect also doesn’t have a way to import routes from other sites or sources, which often will allow you to download a route as a GPX file, for example from a race website or in an email from a friend. In these cases you need a way to transfer a route that is saved in a GPX file onto your watch and this can be tricky; it also differs depending on the model of Garmin you have.
With the newer Garmin watches after connecting the watch it should appear as a folder on your desktop. Open this folder, inside there should be a Garmin folder and in there a NEWFILES folder; this is where we need to copy the GPX file. By default the NEWFILES folder is hidden so you’ll need to enable display of hidden files and folders to see it.
Copy the GPX file from your PC to the NEWFILES folder above and then “eject” the watch. After doing this the watch should display “Updating” for a few seconds and then return to the regular screen. The new route should now be visible in the list of courses in the Navigation menu.
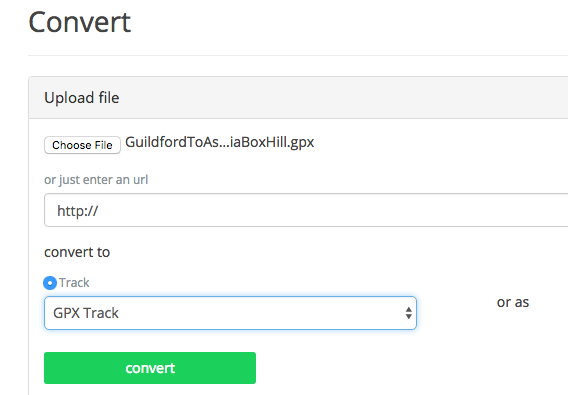
NOTE: For this to work you need a “GPX track” as opposed to a “GPX route” the wrong type of GPX file results in the watch ignoring the new file,so look for an option for a track rather than route when downloading.
If your GPX file doesn’t work then use the as GPSies converter to change it.
Turn-by-turn navigation
The more recent Garmin devices also offer turn-by-turn navigation. This is very much like a car satnav that alerts you shortly before a junction that a turn is coming up and displays information about the new direction and a description, such as a street name.
Tips
- Auto-zoom automatically zooms the map display on the watch in or out such that you can see the track even if you’ve moved some distance away from it. This sounds good in principle but in practice when briefly looking at the display you can’t see how far the next feature is without scrutinising the scale. I therefore recommend leaving this off and zooming manually when required.
- Circular routes can sometimes confuse the watch as it thinks you’ve already reached the end before you’ve even started. Onesolution here is to start the watch a little way after the start.
- The watch can alert you that you’ve left the course even when you haven’t, this can be as a result of poor GPS accuracy (see under thick tree cover or in a city) or from inaccuracies in the route loaded onto the watch from either an inaccurate set of route points or points taken from poor map data.There isn’t an infallible solution here beyond building up experience of how much to trust the watch.
- Very long routes can also be problematic and take a long time for the watch to load. One solution here is to split a very long route into a number of smaller segments, switching from one to the next during the activity. This is a bit of a faff both in creation and during the activity so I’d recommend putting both the long route and the shorter ones onto the watch and using the shorter ones as a backup if you encounter problems.
Charging on the go
For very long workouts the battery life of your watch might not be sufficient for the duration of the workout. In such cases you have a few choices:
- Switch off all unnecessary features on the watch, such as smartphone integration, to save power
- Change to “ultratrac” mode
- Charge the watch whilst using it
I prefer the latter as I like the watch to be accurate and full-featured during a race. To charge the watch you need a portable power pack such as the Anker PowerCore mini, which has sufficient power to change the watch multiple times. Note however that not all power packs work, some I’ve tried don’t recognise the very small current draw of the watch and switch off rather than continue charging. In addition to this you also need to switch the watch’s USB mode to “Garmin” so that it can continue with the workout when a charger is connected.